Saturday, February 28, 2015

COMPANION PLANTING AND MY THREE SISTERS GARDEN.

Companion planting folks. That's what I care about this week. When the thought crosses my mind I see images of Native Americans planting crops to accompany and help one another to ensure a bountiful harvest. You'll understand then why I chose to plant a Three Sisters Garden this year. It combines companion planting with mulching, two of my favorite things... It helps to cut down on weeding or fertilizing with our already busy busy busy farm and parenting life...

mean yeesh we're only butchering every meat animal on the homestead this month, working out the kinks in our recently set up irrigation system, and dont even get me started on the weeding that continues to go unfinished in the garden. Let me just air my dirty laundry for a minute...


See the devastation in these before shots... All weeds.. we aren't perfect.. Homesteads take work and sometimes we get behind in weeding the garden. Such is farm life.. Hence new obsession with mulching.. Mulch it all!

Mulched!

I've been continually mulching my butt off trying to weed and cover every inch of soil in the garden. To my surprise things are going very well and my crops have begun to grow like crazy! In an effort to find what works best I've been researching companion planting.... Basically so I can plant one bed full before I move on to weed, clean, and plant the next.... A little haphazard I know... But companion planting makes everyone happy, especially the plants :)

Mulched!

The Three Sisters Garden consists of corn, beans, and squash. First planted is the corn, in the sunniest warmest spot (plant in several short rows or circles for pollination purposes). Wait until the shoots are about 5 inches tall then plant 1-2 beans at the base of each stalk. 

Mulched!

Wait about 2-3 weeks, until beans are established and beginning to climb. Plant your squash at the center point of your circles or in from of your rows. Heres the just of it... the corn grows as the foundation, the beans then climb the corn giving itore stability, and these together provide protection and shade for the squash to grow and flourish. The corn sucks out nitrogen which the beans replace and the squash provides a form of mulch to cover and protect the soil.  

These companions keep each other warm and water can flow with ease to all the different varieties. Here's an affiliate link that shows numerous planting patterns and designs. 

See those beans!!! They're making their emergence. 


And here! See those squash in the background! Oh yeah baby, I see veggies in my future. 


In the high desert where we live companion planting is fantastic! Vital nutrients can be supplied by one plant and absorbed by another. It also works great for container or urban gardening where there's not much space. 
 

Here they are... This was July 5th and over hip high corn!!! Safe to safe we will have a fruitful three sisters harvest. 

Follow this link to find more interesting TSG patterns!


What are you favorite companion planting techniques? Comments welcome below

Cheers folks!


Friday, February 27, 2015

YOU LEARN SOMETHING NEW EVERYDAY.

If you share in any aspect the same lifestyle as we do, then you're constantly learning. At least I hope you are....

Homesteading is....

Hard work, determination, perseverance, humility, and open-mindedness....

And soooo many more things I am sure I'll figure out.... Did I say pain in the you know what?

Yes at times it can be, but the benefits make up for the cost ten fold!

Any opportunity to learn a new skill or refine an old one should be taken at the first chance.

My current learning curve involves our meat rabbit project. Like I've said before and will say again, I am a total amateur when it comes to these furry creatures. Most of what I do know I have learned from reading endless amounts of literature, and wingin' it, that is a technical term in the homestead world....in case your didn't know! Ha... oh so true it is.

Well today when I arrived at work I learned one more thing about rabbits I did not know.... An experienced rabbit breeding coworker of mine, Megan, lent me her time, first asking me how I know for sure my does are in heat.... Wait... What???

Rabbits have a noticeable heat cycle........????

Wow duh Quincy, you really are a newb!!! ---- My inner dialogue talking smack....

Do your research Q, yeesh! Really though, I have done so much research and read for so many hours my eyes hurt, how could I have missed this?! Everything I have read says they don't necessarily go into heat, as ovulation does not occur until after the buck has stimulated the male. Does can however, reject a male for many reasons, they go into "heat" once everything 30 days but usually will only accept a buck 12-15 of those days.

Seriously, I had no idea. I was struck initially with surprise and as I began the natural response of embarrassment I realized, HEY! You don't need to know everything right away! You will learn, and this embarrassment to, will pass.

Alright then so how in the, where did I, when should they, blah blah blah. The questions are never ending now!

So here's a quote I found from the Food and Agriculture Organization of the United Nations that summed it up for me:


"The female rabbit, however, does not have an oestrus cycle with regular periods of heat during which ovulation will occur spontaneously. Does are considered to be in oestrus more or less permanently. Ovulation occurs only after mating. A female rabbit is therefore considered to be in heat when she accepts service and in dioestrus when she refuses. 
There are many observations which denote the alternating periods of oestrus during which the doe accepts mating and dioestrus in which she refuses (Figure 9). But the present state of knowledge does not make it possible to predict either the respective lengths of oestrus and dioestrus or the environmental or hormonal factors determining them.
It has been noted, however, that 90 percent of the time when a doe has a red vulva she will accept mating and ovulate, whereas when the vulva is not red the doe will accept service and become fertilized only 10 percent of the time. A red vulva is therefore a strong indication, though not a proof, of oestrus. A doe in heat assumes a characteristic pose, called lordosis, with the back arched downwards and hindquarters raised. A doe in dioestrus tends to crouch in a corner of the cage or exhibit aggression towards the buck."
(http://www.fao.org/docrep/t1690e/t1690e05.htm----affiliate link)

So there ya go! 


You learn something new everyday!


Reading, reading, reading about breeding, and more reading....

Q


Tuesday, February 24, 2015

HOW TO BUILD A BEAN TEEPEE.... FOR FREE!

Last year I procrastinated way too long getting our beans planted.

I was discouraged that I had no trellis for them to climb and was doubting that I would see a bean harvest in September. The sooner you get to know me the sooner you'll realize I will never be the person who spends countless dollars on some pre-fab trellis from the Home Depot.

I just refuse. 

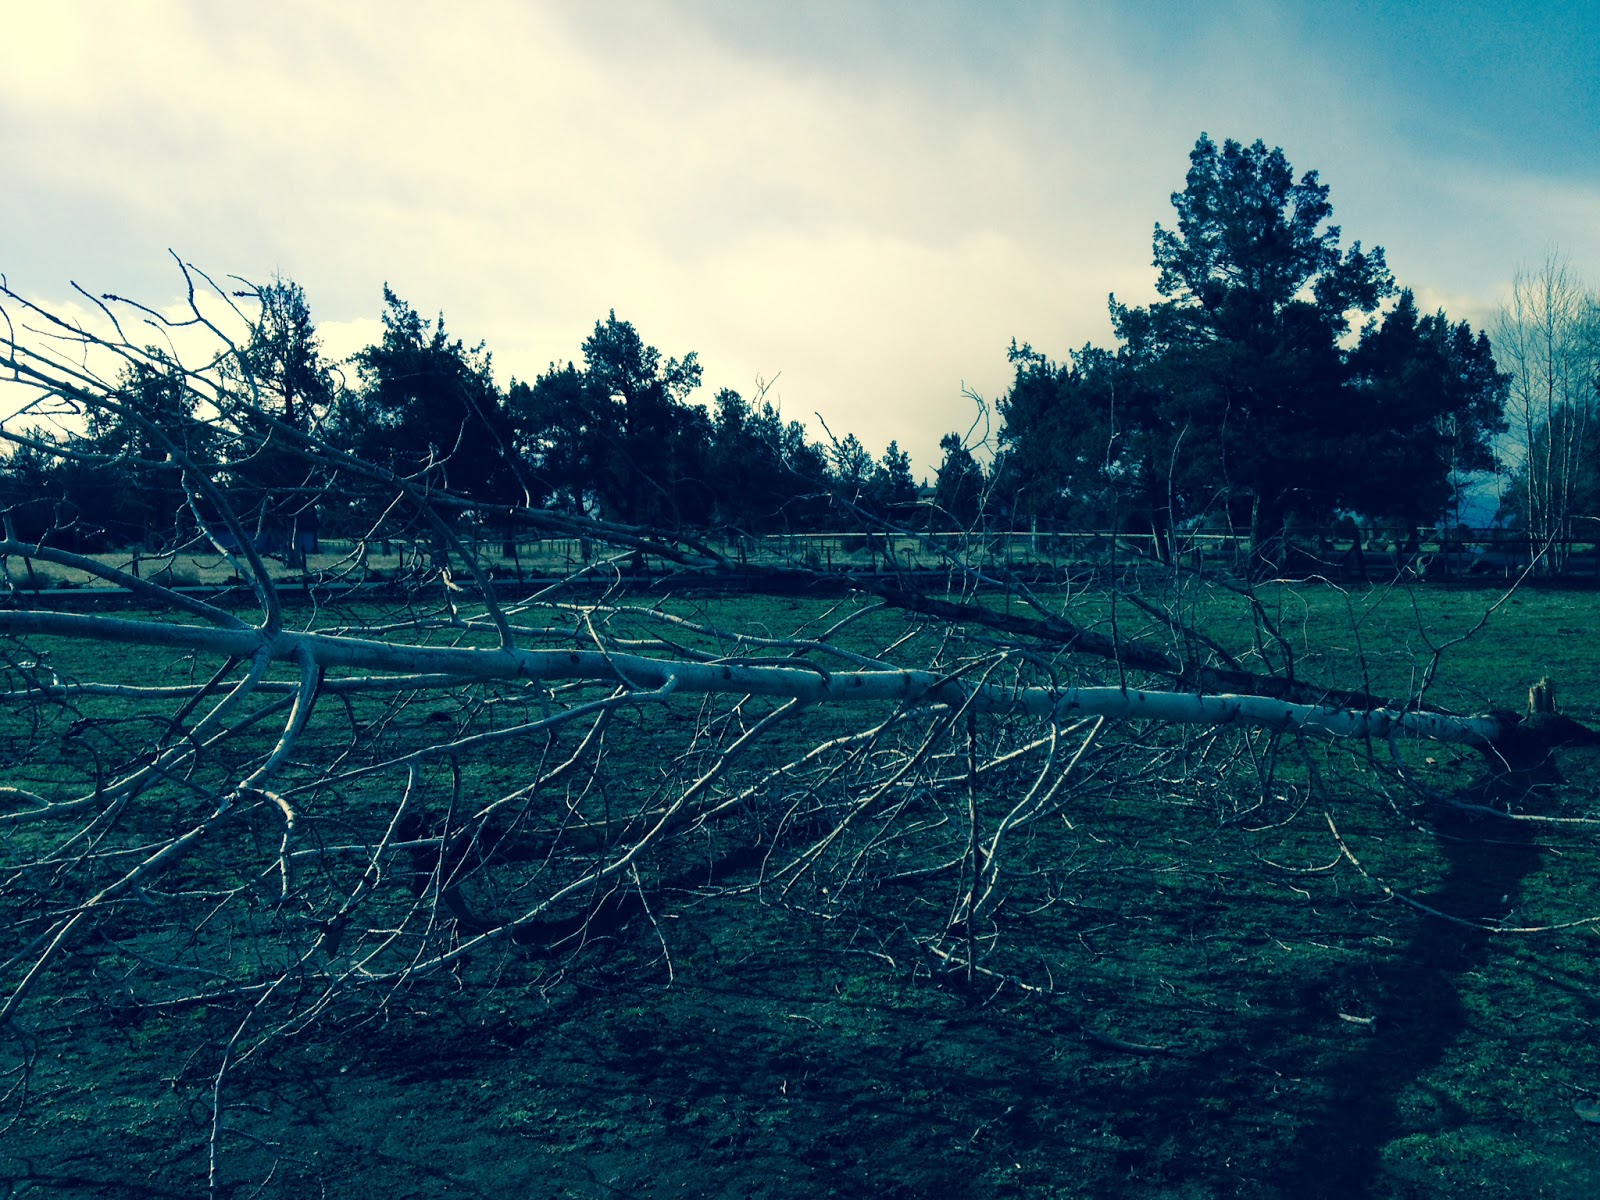
Especially since I am lucky enough to have around 2 dozen say 20 year old aspen trees surrounding my house. Needless to say trees need limbing on occasion. Our fire pit sits right under a few of the biggest trees, since mama likes a big fire, naturally I had to expand the fire pit to suite my needs.... or wants...  ahem.

I took it upon myself to limb up these trees on a hot day and couldn't think of what better way to put them to use than to make a bean teepee!!! It was either this or building a roost for the chickens. Seeing as they already have a suitable roost, bean tee pee it is.

Branches such as these are not hard to come by in the slightest with the vast amounts of ponderosa and juniper in my area. Limbing up trees in this high desert climate is an important task to tackle as a homeowner and community member.

Help drop the fire hazard in your yard!

Limb up them trees and build a teepee!

What do you have to lose? Absolutely nothing... You'll gain a visually pleasing and efficient way to grow not just beans but many other varieties. This would work great for peas or clematis!!! And if you really do have no branches come on over and take some of mine! Many more trees to limb around these parts and its the perfect time of year to start.


Once the branches were down I cut or broke of all the smaller limbs. I only chose branches 2 1/2"-3' in diameter. You could certainly go bigger, but the beans stalks themselves don't weigh that much and with a continuing harvest they won't weight down these branches in the slightest. 

About a dozen branches were needed for this original design, I plan on adding another half dozen at least. This is preferential to how thick you want the walls of the teepee. Personally I want those babies thick with beans, so I will provide more branches for optimal growing, reaching, and climbing possibilities for the bean stalks.


I used my strongest 4 branches to create the corners. Yes my teepee is a little square.. don't care....

 My intent is for 3 sides to be covered in beans with a fourth side open (if you're wanting it circular, then leave about 1/3 of it open). This teepee is after all not just for me to sit in, I got the idea after wanting a real teepee for Ireland. Since I don't get everything I want, I settled deiced for building her one she can sit in, in the garden while mommy weeds, and learn to help in the garden. 

Mainly, the goal is that the opening however big, square or round, needs to face North. I say again, make sure the opening faces North. Gives the little guys inside the teepee a little more time in the light. I made the mistake of facing it totally opposite and suffered a smaller harvest due to losing a few hours of sun exposure.


After I dug holes for all the branches and finished burying them about 6-9" inches deep I used some garden twine to tie the branches all together at the top. I then wound the twine around the bottom 2 feet about 4 inches apart each pass to provide more anchor support for the stalks. 

No special precautions need me taken in securing the branches. I used no gravel, no cement, no support of any kind. Firstly, this baby will go where we go, if we ever have to move the garden our own lives in general i want it easily removed. And secondly, it is always a good idea to move your bean location every year. In order to proven spread of disease you should always plant your beans in a new location every year. 

Give that poor soil a brea!

Ensure a healthy harvest, rotate locations people, rotate I say!

....Sorry, a bit much? Ok.. but really though....

I heard this quote somewhere, which now escapes my pregnant mind.... For legality sake, these words are not of my mouth, I would love to give credit to whomever spoke them...

It goes something like this....

....gardeners harvest a crop, but they grow soil...

How true is that?!?

Our soil needs the TLC more times than the actual plants do, just some food for thought.


And there they were! I couldn't have been happier with the tee pee, wishing for a bigger harvest this year however.  These bean stalks are roughly 2 weeks old in this shot. 


Ireland and I absolutely loved watching them climb higher and higher everyday. This year little farm girl will get to participate in the grading much more! Last year she loved lounging in the shade of this fun teepee! If you have older kids get them involved in the building process! This project could easily be finished in an afternoon with the kids, or during nap time... ahem... 


Planting seeds,

Q


Sunday, February 22, 2015

WINNING.

On Friday I prayed for a homestead miracle and today my prayers were answered!!! With all the hustle and bustle our lives have seen the last few months I am ashamed to say that a couple of our rabbits have been making their home in animal crates and kennels. Quite comfortably actually, but not ideal. It makes manure removal a pain staking process of swapping rabbits in and out, cleaning, re-bedding, and reintroducing them to their cozy clean home. Blah blah blah....

My farm stud was wonderful enough to build me an amazing hutch in which I house whichever rabbit is currently pregnant in order for her to have enough space throughout the process. But with my bearded baby daddy working constantly, the crazy hours he does, building the second hutch has fallen from priority since there are so many other tasks I need him for when I have muscles. Granted I can usually always make something out of nothing, but seeing as my "making" skills are focused in my uterus at this point in time, I find waiting for the help of my man on some heavy lifting is a much better call for me and baby.

Here. Comes. A. Miracle.

Wait for it....

Wait for it....

A good friend of mine, Emily, recently moved out to the country, yay for her!!! Her land lord has this run down barn in which was hiding this perfect gem! And the best part? He didn't even know what he had nor did he see ever have any use for it... That's right baby... It's all mine!

Miraculous right? Am I just a nerd or is that not one dang good looking rabbit cage?


(Yes I was over anxious to put them in the new cage before the farm stud even had a chance to hang it... More on that later!!! )

This may seem trivial to some a ya'll out there, but it makes all the difference for us! Whenever and wherever we can channel money a more productive direction or can create sustainability from within our means-- we call this a homestead win! Heck even the bacon grease I save in the morning is a homestead win on this farm!

It may be old, dirty, and a little rusty but that's just perfect for us!

I see these types of cages scattered all over craigslist, but lets be honest. I have to really really want what I have found or have MORE than enough money to feel comfortable purchasing anything unless it is an absolute necessity.

Maybe its laziness or maybe its tightwadedness.... Yes that is a word... But I have struck gold on Craigslist many a time! The key is to having the money for said necessity already set aside, then you wait... Wait for the right add to come alone then BAM! Homestead WIN! Although I was so fortunate to basically stumble upon this cage in my friends barn.

Like I've said, as I'll continue to say, were as frugal as we can be, its a must. And now any money we could have spent on a rabbit cage or building one for that matter, can now be funneled back into what I have lovingly ( it is finally growing!!!) named The Homestead Fund, to be used for another stead task. As they say a dollar saved is a dollar earned! This is especially important as the sole purpose of these rabbits is to feed our family and save us money! And now that the cage will within the week be hanging a few feet off the ground as the hutch does I can begin working on-designing a structure underneath to catch all the rabbit manure I can handle! Stay tuned next week for a post on rabbit manure tea....

Now that I no longer have to worry about my dear fur babies living arrangements I can focus my time or better yet stress somewhere else. As of late this is our pregnant New Zealand doe, Belle, who is due to kit sometime this week. Yesterday I began seeing signs of hair pulling, so in went the nest box.


Disregard her lack of bedding! I was taking pics last minute and will bed her down with fresh hay and alfalfa after I return from work this evening. It is very important to provide her with as much bedding material as possible as she will eat some of it and use the rest to make her nest. Even though she is still about a week out I want to provide her enough time and there are always chances of early/ late delivery, so better she have it and not need it than possibly lose her kits if they aren't properly bedded. I find myself meandering to the barn often, eagerly awaiting her ritual to make it just right for her kits. Even more eagerly awaiting that time when I check the nest box for the umpteenth time and there are actually kits inside.

I had heard from Belle's previous owner that she is a great mama (one reason I had to have her). I cannot wait to see her in action. This will be all new to me and hopefully ya'll can learn something to.

Have you ever bred rabbits? Tell me all about your trials and experiences here!

Finishing out an evening shift...


Q


Saturday, February 21, 2015

HOMEMADE ORGANIC NIPPLE OINTMENT: a breastfeeding must have!

There are big changes coming down the road for our homestead this Spring. We've got babies of all shapes and sizes due to arrive and so many preparations to be made!

---This week our Seed Savers Exchange order will arrive. Getting to work on our greenhouse and sprouting room this week is a must!

--- Due to kit around the 28th-3rd our doe Belle is beginning to show (what seems to ME to be) obvious signs of nesting.......... As I've said and will say again, I am a beginner at this whole rabbitry bit, so I'm really hoping my second attempt at a successful breeding has been just that.

---Next month, 25 or so Rainbow Rangers will be delivered to the farm and begin their life cycle. I say or so since we haven't committed to how many birds we want to raise. This being a first for us as well, raising BROILERS that is. For them, we must get the brooder set up, buy shavings, new heat bulbs, and stock up on chick feed. I also need to do an inventory of all our brooder supplies i.e., water bottles, feeders, heat lamps in order to assess our need to replace or repair any.

--- Two barn kittens will be coming our way in 6 weeks as well, our last mouser disappeared and his presence has been sadly missed.

I DIGRESS!!!

--- Last but CERTAINLY not least our second little girl is due to arrive in May, the reason behind this scattered pregnant brain of a post...

In order to begin my own form of nesting I decided to conduct a little DIY project and make my own nipple cream! Breastfeeding is hard work and does a number on the ole nipples. Sorry, its true. I used SOOOO much lanolin ointment the first baby around, but it is just to expensive and I was always left feeling dryer, needing more, or wondering if this was really a good product for me or baby.

Never had I entertained the possibility of making my own homemade organic nipple cream. Enter Shaye Elliott at The Elliott Homestead, a professional blogger and my go to gal for all things homestead. She's my mentor though she may not even know it! And she is right, those few days post baby are the hardest on your nipples and a girl needs relief!

I had a very rough first few weeks breastfeeding Ireland. I mean I went through it all; cracked nipples, nipple shields to protect my sensitive skin (which I will NEVER EVER EVER recommend, the nipple guard may have helped with the pain but I was worse off for wear after using that worthless crap! Plus they inhibit skin to skin contact between you and baby which is highly important for latch and bonding. Granted many have loved them, but I will never recommend something to you  readers which I don't love and trust 100%), and every nipple ointment you could think of to no avail.

A word of advice to you moms to be out there.... I was instructed by a close family friend, who so happens to also be a retired lactation consultant, to start stimulating my nipples a couple months before baby to prepare the skin and nerves for imminent stimulation and discomfort. Sorry guys, let the mamas read this part....

She instructed me to chose a nipple cream I liked or simply with soap in the shower to massage the nipple and try to simulate the pressure of breast feeding. This technique is a sort of conditioning for your nipples, let me tell you breastfeeding is a whole different work out for the ladies. Look at it this way, I am not a runner, so I wouldn't just go run a marathon without training right? Take it from me, I did not condition last baby, and that was one humbling, painful marathon. I attribute my short stretch of breastfeeding Ireland to a lack of preparedness and one nipple mishap after another. We finally began supplementing formula and she quickly became a much more efficient eater much to my dismay... Not that she was eating better just that I felt inadequate that I was having such a hard time providing her with what my body was built produce.

Nipples need love. They need help. Nipples need moisture and lots of it! You can bet your tush I'm conditioning those babies every day after my shower this go around.... too much???  What? I only have 12 until baby arrives! You get the picture.

You know who also needs love and help? You do, yes you new or veteran mama out there. I was so hard on myself about my breastfeeding issues those first weeks that I took it out on myself... never a good idea post baby, stress and anxiety only made it worse. Thank god for my farm stud for always pulling me out of those slumps and reassuring me I'm doing the best I can.

Be patient with yourself and baby, take pride in every time your baby latches perfectly or empties a breast with no interruptions. These are the precious moments you will soon miss. And lather your nipples up with this:

Breastfeeding Nipple Cream

http://theelliotthomestead.com/2014/05/breastfeeding-nipple-cream-recipe/#comment-246379


Day dreaming of tiny baby toes

Q

ITS STOCK DAY. YUMMY. SIMPLE. GOODNESS. AND A LITTLE HOW TO...

Two nights ago I roasted a chicken. Today that gift keeps on giving in the form of chicken stock, and tasty treat for the hogs!

So what do you do after you roast a chicken for your family?

Pick it clean and throw it away... Because what else is there to do with it, right?

I hear ya, I used to do the same. Pick every last string of chicken from the carcass, save it for lunch meat or a tasty stew. But there's so much more that chicken can give back to you! Not to mention I boiled the giblets and fed those to the dogs for dinner.

Last night I decided that now is the time. Now is the time to dive deeper into this lifestyle we love so much. Now is the time to get off my butt and make stock of that carcass! Now is NOT the time for laziness, now is the time for preparedness! I have read blog after blog preaching to the high heavens that homemade stocks and bone broths are the way to go...

Well blogging woman out there who I admire and look up to, here I am thanking you for all of your preaching and advice, your addiction is now my addiction.

My name is Quincy, and I love making homemade organic chicken stock.

Ever have that moment when stock is the only ingredient you don't have.... Or the moment when, dang I could really use some stock about now? Or, wow its 4:30 and I haven't even begun to think about dinner.... Never again! Making our own stock was so easy and plentiful that I cannot see just throwing out a carcass ever again. Them things are valuable... aaaaand I got 5 quarts from that baby!

Things you'll need:
- 1 chicken carcass (ours was store bought organic, cannot wait to have our own broilers in the freezer by this summer! Ordering chicks next month...)

-veggies and seasonings for the stock (I used all the veggie left overs from dinner-- carrots, onions, potatoes, even the lemons I cooked inside the chicken originally)

- large enough stock pot

- pressure canner. I used this one! Vintage cookwares/appliances + Quincy = TRUE LOVE ( you can also can the broth by hot water bath, on our stead we opt for pressure canning all the way)

- jars (pint or quart)

- matching rings and lids for jars

I started after dinner, clean-up, and bedtime rituals were over. I added the carcass and whatever left over chicken bits we would not eat, the veggies, and seasonings to the stock pot. I filled it to the handles with water and set the burner on low. It simmered all night, roughly 12 hours by the time I removed it from heat.

In the morning I strained all the solids parts off and that was fed to the pigs for breakfast as you can see
--------->

Next I poured the stock into quart sized jars leaving a 1" head space, and sealed the lids.


Since this is my first time boiling down a carcass and canning stock I decided to follow the method of another blogger cool the broth in the fridge overnight. The idea is that the fats will separate and rise to the top allowing them to be skimmed off the top the next morning. So this turns out to be a two step process (almost 3 in my case since I started that night after dinner) but well worth it for wholesome stock such as it is. The fat which rose to the top was also fed to the pigs in order to use everything and avoid the yucky fat smell in my kitchen garbage. 

The broth was added back to a stock pot, brought to a rolling boil then poured back into jars. With the lids and rings properly secured the jars were processed at 10 lbs of pressure for 25 minutes. Done! Now just to let the jars air cool to room temperature. 

***NOTE: Depending on altitude you may have to change the pounds per pressure, at higher altitudes it is recommended to process at 15 pounds of pressure. Check your pressure canners manual for instruction.

Bada bing! Bada boom! Such an easy and painless process, not to mention all the things I accomplished during all the processing time!

Headed out to plant more seeds!

Q

Tuesday, February 17, 2015

UP-CYCLE YOUR EGGSHELLS

I hate laundry...So as I sat there looking at a stack much taller than Ireland and no end in sight.....
(BTW: ousting our fancy pay per month machines was rough, but with taxes will come a set we can call our own and we checked another source of credit off the list in our mission to rid ourselves of debt before the wedding!!! It's really a win-win but this pile of laundry my mother so graciously did for me is certainly not looking like a win in this mama's day!)

I decided to write a post instead... I know great logic huh? I'll tackle that pile later.... Take piece of mind though that most us homesteaders have a pile of something somewhere needed to be tended to... we'll always get to it...

Anyhow, I though I would clue you in on of my favorite repurposes her on the farm!

Searching for an organic calcium supplement for your egg laying gals?

Look no further!

Here at the High Desert Homestead we up-cycle our girls' egg shells and feed them right back to em'! Yes they are great to feed to your compost pile or pigs, but they are much better used to make sturdier eggshells and keep you wallet happy.


One of the easiest ways to rid ourselves of these shells and put them to good use. The best part? I don't have to do any extra work or spend any extra money. Both things mama loves, yes I'm lazy and cheap.... But hey, this process is so easy I do it in my sleep.

We chose simply to leave a ceramic crock on our counter next to the stove. Whenever we crack an egg it gets thrown in there. Once they accumulate and dry up I'll mash them up as fine as a feel, basically to take away their egg shaped form (nobody likes a hen whose starts pecking at the eggs---- yes I have had one of those... ) and make it smaller and much easier for the girls to consume.

(I know you love my retro wall paper!)

We feed it in a separate feed bowl than their daily rations of feed and provide it on an as needed basis, the girls will nibble at will when their diets are lacking. I try to keep some always available to them while penned up 24/7. When they free range I don't worry so much as they have a much more versatile diet when foraging.

Bada bing! Bada boom!


Sunday, February 15, 2015

FODDER FRENZY

This week on the homestead I strayed a little from my ever mounting to-do list. Any homesteader knows there's more work than rest involved in our lifestyle and at times the tasks can be overwhelming. In these times I look to those tasks which relax and center me in order to let go of some of this chaos.

Oddly enough one of those tasks is my fodder system. Tending to those little sprout lings brings me more joy than I ever could have imagined. 

Maybe it's the fact that I'm growing feed for our farm stead animals completely from scratch! 

Or maybe it's the fact that I can turn a 50 pound bag of barley seed into 300 pounds of fodder feed. 

It could even be the fact that I can feed my livestock fresh sprouts in the dead of winter. 

Or maybe it's just the ease at which I can pick up our bags of barely just a mile and half down the road. 

All of these are great reason for this lady to spend some time with the seeds! Just think, that is 6 pounds of fodder for every 1 pound of barley seed. So if a horse needs between 1.5-3% of its body weight in roughage per day then, for my girl Sweet Pea, who is roughly 1000 pounds, she needs anywhere from 10-12 pounds of feed per day..... Do you realize 1 pound of seed made into fodder covers about half of her intake for the day??? That's what I'm talking about!

OK, Q, what is this fodder that you speak of???


Basically its immature grass sprouts grown in trays to about 8-9 days maturity--depending on what your feeding, and the light accessible to the sprouts.

I grow my small amount of fodder in plastic storage drawers and it works great! At this point I am only supplementing my farms diet, but next winter I hope to provide at least 50% of the animals' diet with fodder.....

All you need to do is water the fodder twice a day, or keep it just moist enough so the sprouts will not dry out, and you're gravy! I have even heard it is best to recycle your water. I do this for a few days before changing the water, it starts to smell yucky especially in warm season when flies will be attracted to it.... and commonly drown in the water.... not so yummy. So use new water or recycle the old, especially if installing a pump system (my dream fodder system would have one!), whatever works best for you and your animals.

(Day 6: Rabbits love it about this age)
--Don't mind my chipped polish ;)--

Just imagine the possibilities!!! 

This means I can feed all of my animals fresh sprouted barley grass through the winter... A form of protein which is very important to foraging farm animals. Especially my free range chickens and horses. 

My hens and ducks prefer it around day 3-4 since the sprouts are still very new and white. Our hogs will eat just about anything so they like it at any stage, but like the birds I see the sprouts and seeds consumed but most of the greens left behind. So I find the older I let the fodder mature the more likely it will go to the rabbits and horses. 

Maybe a system like this???

I have ample space in our laundry room. It is a separate room inside our detached garage with lots of space, and the place I germinate my fruits and veggies (which I cannot wait to start!). 

So there it is. One of the easiest ways to feed your livestock that you never new about..

Bada bing bada boom
Watering the fodder,

Q

Saturday, February 14, 2015

2015 -- GOALS FOR THE STEAD

Not that I don't love winter, it used to be one of my favorite seasons. But as of the last 5 years my little high desert haven has been a stranger to the real winter season to which myself and many others were used to as kids. No more white Christmas' for us Central Oregonians, unfortunate for a desert climate with such high fire risk.

This inefficient winter only feeds my anticipation and gives way to the all of my dreams of spring! So I have begun making the necessary preparations and lists for this years homestead projects--- granted I did start this list a couple weeks ago.... I kept adding more and finding new to dos so naturally I put off posting until now. I have listed future projects and to do's as well as addressed all of our current and already progressing responsibilities(**).

PIGS**-- If we decide to stay in Tumalo one more year, creating a more permanent hog enclosure is a must! Don't get me wrong my handsome other half is pretty crafty and fashioned an awesome and well thought out recycled pallet enclosure, but alas our last pig broke some panels and escaped numerous times... Not an issue since we're fenced all round our 5 acres with a great front gate, and we simply replace the boards or the whole pallet. But coming home and being bum rushed by a 200 lb hog last year scared the bejeezus right outta me! We will be slaughtering our two current hogs the first week of June to freeze, preserve, and accommodate our annual Sisters Rodeo Kick-off party. In our attempt to be self sufficient we would love to perform the whole process ourselves but as we have never done this before we have much to learn and many tools/supplies to gather to make this possible. In previous years we'd simply call our local mobile slaughter man and he comes to do the dirty work then takes the meat directly to our local Redmond Smokehouse for processing and smoking if wanted. We hope to avoid that wait and cost of that option. We need to acquire proper cutlery and a scraping bell of course then will come the issue of how we preserve it. Another task to get under my belt! Woo! A knowledgable coworker and friend of Spencer's has graciously offered his services in exchange for a a small portion of the meat and a few dozen of our free-range eggs. I don't know about y'all but mama loves to barter and exchange on this homestead, it's an old practice sadly forgotten by our culture. I seriously DIGRESS! More about our homestead hogs later.

RABBITS**-- slaughter first litter of kits(mid April), learn to treat hides for selling furs. Buy new rabbit cages and build new tables. Build more nesting boxes. Incorporate free range foods (build rabbit tractor) and homemade sourced feeds.

HORSES**--rotate pastures to the front of the property, transfer manure to garden, hang hay feeder, set up two more boarding pastures.

LAYERS**-- set up brooding room, buy a rooster in hopes of broody hens, buy 6 more laying hens, build sand bath

BROILERS-- set up brooder, build chicken tractors, order 60 broilers, buy chicken plucker, buy hanging waterers/feeders.

DUCKS**-- order 4 Cayuga ducks, create house near pond, buy egg incubator.

TURKEYS- buy 3 turkeys (one to eat, two to breed)

BEES- research bee growers, build hives, buy bee suit, miscellaneous supplies, bee keeping books

GARDEN**-- gather cardboard boxes, begin making mulch, rebuild garden fence, create bed along backside of garage and under kitchen window, transplant hops away from house/ secure ladder in ground for hops to climb,

PASTURE MANAGEMENT**-- see horses above, buy a harrow for field, clean/move horse manure

GENERAL FARM**-- get on a consistent hay purchase schedule (at least a ton/ month), buy more trash cans (feed storage), buy bulk feeds and bulk dry pantry goods(Azure Standard)

As you can see there are a great many tasks that need to be done. And so many more that we yearn to tackle in the coming year. As Ive said in this and earlier posts, we want to learn, and grow in 2015. I want to earn more notches on my homestead belt! There's so much we are capable of with the privelage of our property, and if we might be moving this fall we had better get the most of it. Come let's get started!

Headed out to the barn,
QB

THE PIGS OUTTA THE BARN.... NO SERIOUSLY...

So there I was standing between a pig and the back door...

She jived to the left so I jumped in front of her.....

She goes the right, the dogs about pooped themselves....

Sometimes the pigs get out.... Its just a fact of life...

An entertaining one at that....

Did I mention this pig trapping occurred in my dining room??? O ya! I said it! the other night our female pig ran three laps through my house...

In through the sliding glass door into the living room through the kitchen and dining room... lap.... and again..... and again....

All the while I'm laughing hysterically and trying to forget how small my bladder feels with this pregnancy.... Not existent.... I practically have to drink my fluids on the toilet... too much?? But so so true... Ha!

Mind you, this all started with Dexter.... Yes the Showtime series which Spencer and I are sucked into this winter. There we are sitting watching, biting our fingernails, anticipating his next move when.....

What is that?

Do you hear that?

I look over at Spencer as he simply sighs and says, "Oh, babe..."

He paused the show and then I heard..... Pleasantly loud oinks coming from the back porch. We stood up walked into the dining room and there they were, standing calmly at our sliding glass window.

For whatever reason once the pigs had made it up on the deck they couldn't get back down. What you can go up stairs and not down?!?! Well apparently they couldn't, so around and around the deck we went trying to block them so as to push them towards the stairs....

Well right about that time little farm girl hears the commotion and comes to try and help mom and dad. She had good intentions which let to the great pig chase in the house. She opened the sliding glass door to see the commotion and right as I turn around to tell her to go back inside.... In darts the pig right past Ireland and into the house. At this point she so excited by the frenzy that she almost let the other one in!

Well we finally got everyone safely penned up for the night.... After a goat tying rope made it around the gilt so we could get a hand on her.... And boy was that a loud affair!

The horses must have been intrigued by the commotion as all 6 came over to stand in a perfect line and watch the show!

Let me just make it clear... if you're looking for entertainment just let a pig loose.... no grease necessary....

You see sometimes in the life we run into some not-so favorable situations. We could have panicked and argued about who checked on the pigs last instead we found this to be hilarious. This wasn't our first rodeo... Or better yet pig wrangling... In these times of stress it is best to just laugh...

The bottom-line is pigs escape. They're crafty, smart, and love testing the limits of their pens. The saving grace is that though they may escape from time to time, they're 100% food driven. They don't get out to escape and run away, they get out to explore and EAT! They're not wanders which I am so glad for.

Alas with a worry wart control freak like myself there is no rest! I simply couldn't stand the risk of something happening to our precious bacon or dealing with an angered neighbor whose garden was ruined. So, we rebuilt their new enclosure out in the barn near the other livestock. They aren't tiny babies anymore and need room to run, so yesterday they were moved from their baby brooder pen into the pig boy pig pen which was oinkers' humble abode last year.

Safely tucked away in their pen with no gate they will happily await their fate. After all we are raising these hogs to feed our family and a multitude of guests we will host throughout the summer season. They will be slaughtered the first week of June, humbly by our own hands, here on our homestead. We will give them thanks and not an ounce will go to waste.

I cannot wait to incorporate scraps and head cheese into our dogs diet to supplement their regular dog food diet as I slowly transition to feeding the dogs solely from our homestead meat projects or making all their food from within the homestead. This is a great way to use what we won't (or Spencer WILL NOT eat, namely headcheese) eat and leave nothing to waste!

As they say.... Waste Not Want Not!

So it goes!

Q


BRAGGING RIGHTS!

Every morning I am awaken my the sound of Ireland's little feet walking across the hall and into our room. Without fail she wakes up, comes in, and the three of us enjoy a good ole family snuggle. She talks to us about oh so many things, some of which we understand, and some that we don't. I simply can't get enough of her little antics and adorable voice.


Ok, ok maybe I am a little biased. But heck, we made a beautiful kid! Nothing wrong with a proud parent...


And this guy?!

Never could a woman ask for a more supportive partner. Not to mention the fit of his arms wrapped around me. Ah swoon! Ok, enough enough! The best parts about Spencer are the ones I'm still learning about everyday, we've known each other a decade and he still surprises me, he continues to grow as a man and a partner, and yet he's still the best friend I had as a teenager. Among these, watching him become a father has only made me love him more, and boy does Ireland lover her daddy. Nothing is more attractive than a good man whose an even greater father. 


And the best part? I get to call them my mine.


Happy Valentines Day!

Covering everything in chocolate,

Q

Saturday, February 7, 2015

100th PAGE VIEW!

Hi Ya'll

When I began this endeavor I was worried that no one would ever find my meger little blog tucked away in cyber space.

Well that is inherently not so! Just today the HD Homestead blog hit its 100th page view! Woot Woot!

I am happy to say that I don't rely on page views to fuel my drive for this blog. I rely on the support of my family and friends, my handsome bearded fiance, our loving little Irish gem (and her soon to be little sister), and the piece of ground we have been so lucky to work and mold into the perfect setting for our budding homestead.

Thank you to all of those of you out there who may have passed over my blog intentionally or otherwise!

Stead updates:
This week we experienced some very unfortunate weather. What felt earily close to hurricane force winds swept across the property with a vengeance destroying most everything in its path.


We rose to quite a disaster. Several sheets of metal roofing had been ripped from the barn, esposing part of the hog pen to the elements, needless to say the pigs enjoyed a little mud play in the still quite warm blustery weather. Anything and everything that was ever left out anywhere on the property was plastered along our northern fence line. Six count em' six of our beautiful aspen trees met their demise, but will be salvaged, cut, and sold for firewood. That's a homestead homerun, free wood from a terrible storm? We'll take it! And one whole bale of hay cast to the 4 winds, my poor lover man did his best on that feeding disaster.


Other than the said state of our homestead from the storm we will be trying to cross a few more things off our list this week:

We will be moving the hogs into a larger pen out under the pole barn and setting up a permanent piped watering set up for them.

I am beginning to condition our two mares... from the ground that is, I can barely wait to throw my leg over ole Sweet Pea after baby girl Gardner makes her appearance in late May.

Continuing our general yard work is a must, as we have so many leaves and other debris to clear out of the garden beds and the water feature.

I have accumulated a large amount of cardboard boxes in order to start creating some new garden beds which I will begin working on this week.... I will be sure to make a full posting on my progress.

I also want to start some seeds indoor this week, our fodder room... which isnt currently growing any fodder.... but has a great deal of open counter space and great window with sufficient sun exposure... If anything I'll set up a grow light to help germinate the seeds.

Holy cow its already February! Much to be done...


Dreaming of Summer riding...
Quincy


RABBIT GESTATION: TRIALS. ERRORS.

Disclaimer: This post contains photos of rabbit genitals, read on if you dare!!!

Any day now we will see if in fact ole Chester rabbit got our first doe pregnant. If she did conceive that means she's on day 28 of her cycle and those kits could be here any day!

So I thought I would spend a little time talking about a rabbits gestation cycle and give you some insider tips from our rabbit experiment!  

Firstly, when I began this rabbit endeavor just a few months ago I didn't have a clue..... Literally, I had no idea about rabbits other than that they do the horizontal mambo aaalot! And I can cheaply raise their offspring as a sustainable meat source?!? Fuh get about it! I was hooked to say the least. It was all Spencer could do to hold me back from going out any buying them the instant I knew possible. I prevailed.... For a little bit before eventually buying our rabbits. But I digress, I have learned so much in these last few months that I feel it won't be long before we're in a consistent pattern with the rabbits.

Lets talk testicles... Rabbits testicles that is.... I am such a newb that these necessary entities never once crossed my mind until handling Chester at home for the first time. It was at that moment when I turned him over and was horrified at what I saw...

Initially I was filled with confusion as to the looks of those.... things, was this normal? Does he have an infection?!? Wow those are really red.... Is he even a male, or are these huge rabbit labias.... sorry too much info.... Anyhow, after my initial awe had passed my friend Sheree suggested we use that all too powerful tool, the internet. Needless to say I learned a great deal that day, yes this was normal, no there's no infection, redness is normal, and no Quincy rabbits do not have labias....


Well there you go!


Rabbits, like most mammals carry their testicles on the outside of their bodies, unless they are under certain stressors. Their fight or flight mechanism always leans towards flight as speed is their only mode of escape, in these times flee rabbits can pull or tuck their testicles up inside their bodies to protect them.... weird huh?

Well you learn something you everyday!!!

As I mentioned before, my rabbit, Snow, is in her 28th day of a 31-day gestation cycle and I just saw evidence of either hair pulling or shedding in her and Belle's pen this morning. So tomorrow I will pull Belle out into a clean separate enclosure and put a best box in with Snow. I'll fill the next box with hay, she will will add to it by pulling her hair to make a nest in prep for her kits. 

Update:
Unfortunately, Snow did not kit this past weekend....

So as was planned we have bred Chester to our second doe, Belle. She will be due to kit anywhere in the first week of March, since she is a larger rabbit breed their gestation can last anywhere from 31-35 days, where as smaller breeds kit between 28-33 days, every woman is different!

Since I was flabbergasted at having no kits on the homestead this month I decided to do another experiment to ensure our does get bred. As I have stated before, I'm basically a novice at these obsessions I blabber on about, and being such a newb when I bred Chester and Snow I did as I have seen many of my fellow homesteaders do on YouTube and other blogs. And that is let the buck cover the doe a few times, maybe 3-5 times, then remove the doe once again (Did I mention it is always smart to breed them inside the bucks pen? Does can become very territorial of their home and may become to stressed refuse to mate, so always take the doe to the buck..). Well for whatever reason they did not conceive and this mama is baby bunny-less (sigh)

Back to the experiment...

Since it was time to breed Belle I decided to monitor their breeding session closer. It occured to me at about the time he was mounting her the first time that this is only the second breed he has ever performed.... Chester was only 6 months old when I brought him home, old enough to breed but did he even know what he was doing??? I quickly realized that no he did not.... Rabbits don't have the most romantic mating ritual to begin with but poor Chester didn't have a clue....

He was mounting her face, her side, and the correct way.... But was anything happening!!? I finally got the rabbits to turn around so I could assess the situation and it looked as though Chester meant well and was very excited but was just not properly engaging the doe...

So I figured, heck! Lets let em shack up for the night and Belle can show Chester how its done! Hes just a young buck and I think he may have just needed some time for romance and practice. We are now anxiously awaiting some early spring kits and making all the proper preparations. A word from the not so wise, when breeding your rabbits keep a close eye on their water. Pregnant and nursing does need roughly twice as much water as their counterparts. Make sure you're checking often. Keep their water bottles full and make lots of bedding available to them, especially the closer they get to kitting time. I myself am out to the barn checking on animals all through out the day in order to ensure their proper care, usually once in the morning like 6 or 7, once around noon, and at least once more before dinner, and maybe once again before bed. After all that is why I dropped hours at work, to give in full time to my homesteadin' country gal routine.

I can't wait to get this rabbit journey underway and really begin maintaining a sustainable meat source.

Dreaming of Rabbit stew..
Quincy